Hazard Zone Markings in Industrial Facilities
Industrial facilities become risky when machines, forklifts, pedestrians, storage areas, loading zones, and emergency equipment overlap without clear visual control. The problem is not only the hazard itself, but how quickly workers can recognise it during a busy shift.
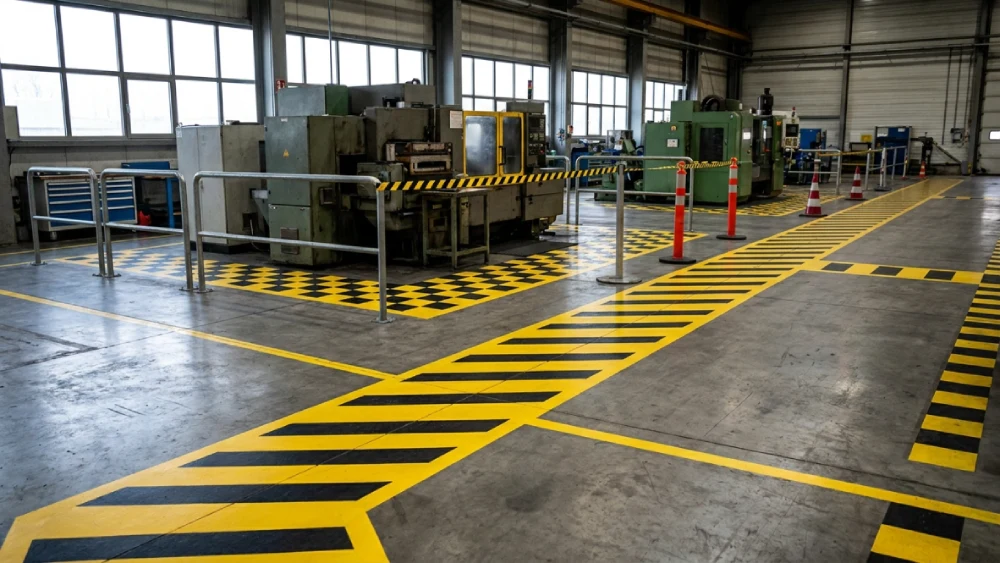
The serious action is to install Hazard Zone Markings in Industrial Facilities that define danger areas, caution routes, machine safety zones, and keep-clear spaces. Key colours include red for danger/fire equipment, yellow for caution/aisles, and black/yellow for high-risk hazards.
The quick clue: clear hazard markings make risk visible before someone steps into danger.
For professional surfacing and industrial marking support, Total Surfacing Solutions can help businesses plan safer, clearer, and more durable working areas.
Hazard Zone Markings in Industrial Facilities: Safety Map
Hazard zone markings create a visible safety map across industrial sites. This section explains how marked danger areas, caution spaces, machine zones, and keep-clear routes help workers understand risk faster.
Hazard Zone Markings in Industrial Facilities are visual floor or surface markings used to identify areas where extra caution, restricted access, or controlled movement is required. They help workers, drivers, supervisors, contractors, and visitors recognise hazards before entering risky spaces.
These markings are commonly used around machinery, forklift routes, loading bays, chemical areas, fire equipment, pedestrian crossings, storage zones, and maintenance areas. A strong marking layout supports daily safety because it gives people a visual instruction at the exact point of risk.
The most effective layouts are simple and consistent. If every colour, line, box, or striped zone has a clear purpose, staff are less likely to ignore or misunderstand the system.
A wider guide to industrial floor marking can help site managers understand how hazard zones, traffic routes, storage bays, and walkways work together.
| Hazard Zone Type | Main Purpose | Common Location |
| Red zones | Danger or fire equipment | Fire points, no-go areas |
| Yellow zones | Caution or aisles | Walkways, traffic routes |
| Black/yellow zones | High-risk hazards | Edges, machinery, loading points |
| Keep-clear boxes | Access protection | Fire exits, equipment panels |
| Machine zones | Safe working boundary | Production machinery |
| Crossing points | Shared movement control | Forklift/pedestrian areas |
| Storage boxes | Stock discipline | Pallet and material zones |
Hazard markings are not just paint. They are a working safety language that should be easy to read at speed.
Colour Codes Matter: Fast Warnings
Colour choices help workers understand risk quickly. This section explains why red, yellow, and black/yellow markings are commonly used and how consistency prevents confusion across busy facilities.
Key colors include red for danger/fire equipment, yellow for caution/aisles, and black/yellow for high-risk hazards. These colour choices work best when they are used consistently across the whole site.
Red is often used where people must stop, avoid, or keep access clear for emergency or fire-related equipment. It can also highlight restricted danger areas where unauthorised access should be prevented.
Yellow is commonly used for caution, walkways, aisles, forklift routes, and general traffic guidance. It helps define movement without making every area feel like an emergency.
Black/yellow striped markings are useful where the risk needs stronger visual impact. They are often used around machinery edges, ramps, loading hazards, trip risks, and impact-prone zones.
Practical colour use:
- Red: danger, fire points, restricted access
- Yellow: caution, aisles, general movement routes
- Black/yellow: high-risk hazards and warning zones
- White: storage bays or general boundaries
- Green: safe areas or emergency direction where suitable
- Blue: mandatory instruction zones where needed
Clear colour systems also support health & safety line marking because workers need fast visual cues during normal operations.
Colour is only useful when people understand it. Staff training and site signage should explain what each colour means.
Machine Safety Zones: Clear Boundaries
Machine Safety markings define where people should stand, move, load, and stay clear. This section explains how floor boundaries help reduce contact with moving parts, pinch points, and maintenance hazards.
Machine Safety depends on more than guarding and procedures. Workers also need visible boundaries that show where safe standing areas end and higher-risk machine zones begin.
Machines may create hazards from moving arms, rollers, conveyors, cutting areas, heat, noise, pressure, loading points, and maintenance access. Markings help show where workers should not stand during operation.
Black/yellow hazard markings are especially useful around machine danger points. Red keep-clear zones may also be used where access must remain open for emergency shut-offs, control panels, or fire equipment.
Machine marking areas include:
| Machine Area | Marking Purpose |
| Operating boundary | Shows safe working edge |
| Maintenance access | Keeps service area clear |
| Control panel access | Prevents blocked controls |
| Moving-part zone | Warns of contact risk |
| Loading point | Controls material movement |
| Emergency stop access | Keeps route clear |
| Noise or heat zone | Warns workers early |
| Restricted access area | Prevents unauthorised entry |
A well-marked machine zone reduces hesitation. Workers can see where to stand, where not to cross, and where materials should be placed.
Machine markings should be reviewed whenever equipment is moved, replaced, or reconfigured. Old lines around new machinery can become dangerous if they no longer match the real hazard.
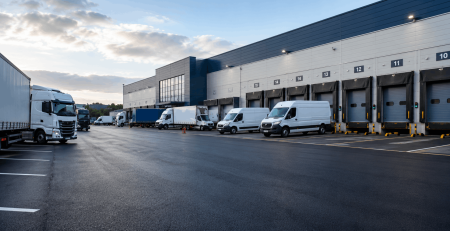
Forklift Conflict Areas: Safer Routes
Forklifts create a serious risk when they share space with pedestrians, stock, and machinery. This section explains how hazard zones, crossing points, and lane markings reduce dangerous movement conflicts.
Forklift conflict areas usually appear near loading bays, racking aisles, blind corners, dispatch zones, pedestrian doors, and pallet staging areas. These spaces need strong visual control because movement is frequent and sometimes rushed.
Hazard markings can show where pedestrians should not stand and where forklift drivers must slow, stop, or give way. Crossing zones should be placed where visibility is strongest, not simply where people already take shortcuts.
A site that already uses forklift lane markings can connect those routes with hazard zones so drivers and pedestrians understand the full traffic system.
Forklift hazard controls include:
- Stop lines at crossings
- Forklift-only lanes
- Pedestrian exclusion boxes
- Blind-corner warning zones
- Directional arrows
- Loading bay keep-clear areas
- Pallet staging boundaries
- Speed-control markings
- High-contrast crossing points
- No-walk zones near turning areas
Clear forklift hazard markings can help prevent warehouse accidents by making vehicle and pedestrian decisions more predictable.
Forklift routes should be inspected during real working hours. A layout that looks safe on paper may fail when stock, staff, and vehicles are moving at full pace.
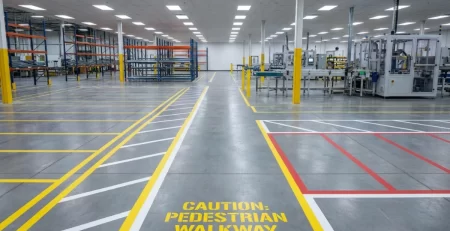
Pedestrian Exclusion: Risk Control
Pedestrian exclusion markings show where people should not walk, wait, or stand. This section explains how exclusion zones protect workers from vehicles, machinery, loading activity, and restricted industrial hazards.
Some areas should not be shared by pedestrians and vehicles. If separation cannot be created with barriers, clear markings help communicate that the area is not a safe walking route.
Pedestrian exclusion zones are especially useful around loading bays, machine operating areas, maintenance work, forklift turning circles, battery charging points, and material-drop zones. These markings reduce casual walking through dangerous spaces.
Black/yellow hazard lines can show high-risk boundaries, while red can highlight no-access danger areas. Yellow can guide people toward safer aisles and crossings.
A site designed around line marking for efficient operations can improve safety and workflow at the same time because people and vehicles follow clearer routes.
Pedestrian exclusion areas may include:
- Forklift turning zones
- Machine operating areas
- Loading bay edges
- Crane or lifting zones
- Battery charging areas
- Chemical handling points
- Maintenance-only spaces
- Restricted storage areas
- Door swing zones
- Waste compactor areas
Exclusion markings must be respected. If workers keep crossing them, the site may need better walkway placement, stronger barriers, or clearer supervision.
Fire and Emergency Areas: Keep Clear

Fire points, emergency exits, and safety equipment must stay visible and accessible. This section explains how hazard markings protect emergency access and prevent storage from blocking critical equipment.
Industrial sites often become cluttered during busy periods. Pallets, bins, tools, packaging, and temporary stock can easily block fire extinguishers, alarm points, exits, first-aid areas, or electrical panels.
Red keep-clear markings help show where materials must not be stored. These markings give supervisors a fast way to spot blocked emergency access during inspections.
Emergency zones should be obvious from a distance. If workers need to search for fire equipment or exits, the marking system is not doing enough.
Keep-clear areas include:
| Area | Why It Must Stay Clear |
| Fire extinguishers | Immediate emergency access |
| Fire alarm points | Fast activation |
| Emergency exits | Safe evacuation |
| First-aid stations | Quick response |
| Electrical panels | Maintenance and isolation |
| Sprinkler controls | Emergency access |
| Spill kits | Fast containment |
| Safety showers | Immediate use |
Red markings work best when paired with signs, lighting, and regular housekeeping checks. A marked fire point that is repeatedly blocked needs management action, not only new paint.
Emergency markings should be refreshed before they fade. In a real incident, unclear markings waste time.
Storage and Aisles: Flow Control
Storage and aisle markings prevent clutter from spreading into hazard zones. This section explains how boxed areas, aisle lines, and no-storage markings keep routes clear and reduce operational risk.
Industrial facilities often lose control when storage areas are not marked clearly. Pallets drift into aisles, tools sit near machines, and stock blocks emergency access or forklift turning routes.
Yellow aisle markings help guide movement. White or other site-specific bay markings can define where materials, equipment, waste, and finished goods should be stored.
No-storage markings are important around crossings, doors, machinery, fire points, and blind corners. These areas must stay open for visibility and safe movement.
Storage marking priorities:
- Pallet bays
- Raw material zones
- Finished goods areas
- Waste collection points
- Tool parking areas
- Maintenance equipment zones
- No-storage boxes
- Emergency access routes
- Racking clearance lines
- Inspection areas
A good storage layout supports safety because it reduces unexpected obstacles. It also makes housekeeping easier because misplaced items become immediately visible.
Storage markings should match real workflow. If a marked bay is always overflowing, the layout may need redesign rather than repeated reminders.
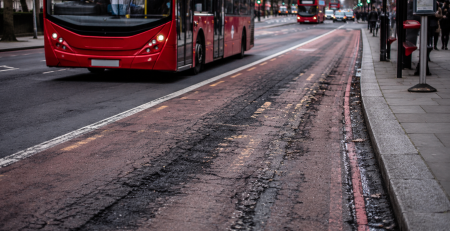
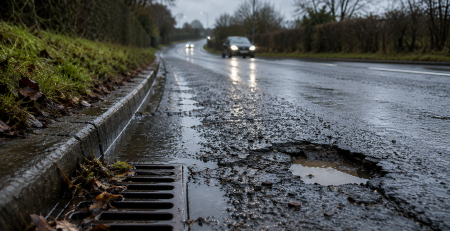
Surface Condition: Marking Durability
Hazard markings only work if they remain visible and properly bonded to the surface. This section explains why damaged floors, potholes, dust, oil, water, and loose material reduce marking performance.
Line markings depend on the surface underneath. If the surface is cracked, dusty, oily, uneven, wet, or breaking apart, markings may wear quickly or fail to bond properly.
Industrial floors and external yards should be checked before new hazard markings are installed. Poor surfaces can make even a good marking plan look unclear within a short time.
Potholes and uneven areas are especially important in vehicle zones. They can affect forklift control, HGV movement, pedestrian safety, and the visibility of marked routes.
Facilities with damaged external routes may need pothole repair services before hazard zones or traffic markings are refreshed.
Surface issues to inspect:
| Surface Problem | Marking Risk |
| Potholes | Broken line continuity |
| Oil contamination | Poor adhesion |
| Dust and loose debris | Weak bonding |
| Standing water | Reduced durability |
| Cracks | Markings split or fade |
| Uneven tarmac | Vehicle instability |
| Old faded lines | Confusing route signals |
| Loose aggregate | Poor finish quality |
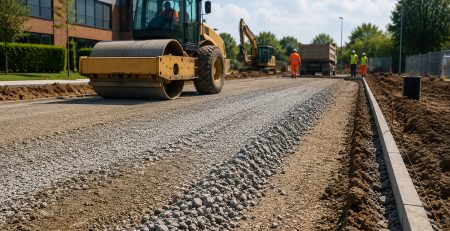
For sites needing broader surface preparation, tarmac installation services can support safer traffic routes before new hazard markings are applied.
A strong marking system starts with a stable surface. Paint alone cannot fix unsafe ground conditions.
Essex and Hertfordshire: Local Sites
Industrial sites in Essex and Hertfordshire often combine warehouses, external yards, loading routes, and vehicle-heavy spaces. This section explains why local surfacing and hazard marking should be planned together.
Many commercial premises operate across both indoor floors and outdoor yards. Forklifts, vans, HGVs, staff, visitors, and materials may move between these spaces throughout the day.
Outdoor surfaces in busy industrial areas can deteriorate from traffic, weather, heavy loads, and repeated turning. If the surface fails, markings fade faster and hazard zones become less reliable.
For larger Essex yards or industrial traffic routes, machine lay tarmac can help create smoother, more consistent surfacing before new markings are planned. Where damaged areas already exist, pothole repairs in essex can help remove hazards that interrupt route clarity.
Hertfordshire sites with external loading areas, service roads, or shared vehicle zones may also need surface improvements before marking upgrades. machine lay tarmac in hertfordshire supports larger surface preparation, while pothole repairs in hertfordshire can help restore damaged areas before safety markings are refreshed.
Local site checks should include:
- Machine danger zones
- Forklift routes
- Outdoor yard markings
- Loading bay edges
- Pedestrian routes
- Pothole locations
- Emergency access points
- Storage bay creep
- Old line confusion
- Weather-exposed markings
A local industrial marking plan should never treat floor markings and surfacing as separate issues. The safest result comes when both are planned around real site movement.
Inspection Routine: Keep Visible
Hazard markings need regular inspection because industrial sites change quickly. This section explains how maintenance checks, staff feedback, and refresh schedules keep markings useful.
A hazard marking system should remain clear during normal operations, not only on installation day. Forklift traffic, cleaning chemicals, tyre wear, pallet dragging, and weather can all reduce visibility.
Inspections should check whether colours are still clear, lines are continuous, and staff still understand the layout. If markings are faded or ignored, the risk-control message has weakened.
Old markings should be removed or corrected when layouts change. Conflicting lines can confuse workers and create unsafe shortcuts.
A professional review from Total Surfacing Solutions can help identify whether markings, surfacing, traffic flow, or hazard visibility need improvement across operational areas.
Inspection questions to ask:
- Are hazard zones still visible?
- Are red keep-clear areas blocked?
- Are yellow aisles being followed?
- Are black/yellow hazards obvious?
- Are machine zones still accurate?
- Are forklift routes still clear?
- Are storage bays respected?
- Are old markings causing confusion?
- Are outdoor lines wearing faster?
- Do staff understand the colour system?
Inspection should be practical and regular. The goal is to catch fading, damage, and layout confusion before they become accident risks.
Final Hazard Plan: Next Step
A strong hazard marking plan should be clear, consistent, and built around real workplace risks. This section brings colour coding, Machine Safety, forklift routes, emergency access, surface condition, and maintenance into one action path.
Start with a site walk-through during normal operating hours. Watch how people, forklifts, machines, stock, and vehicles move when the facility is actually busy.
Then identify danger zones, caution areas, machine boundaries, storage problems, pedestrian conflicts, and emergency keep-clear spaces. Markings should solve real movement and safety problems, not just decorate the floor.
Next, check the surface condition. Damaged tarmac, potholes, loose material, faded lines, and broken surfaces should be addressed before a new marking system is installed.
For complete planning, Total Surfacing Solutions can support surfacing and marking improvements that help industrial sites become clearer, safer, and easier to manage.
Follow this route:
- Map machine safety zones before marking begins.
- Identify forklift and pedestrian conflict points.
- Use red for danger and fire-related keep-clear areas.
- Use yellow for caution, aisles, and movement guidance.
- Use black/yellow for high-risk hazard areas.
- Mark storage zones to stop stock entering routes.
- Protect fire points and emergency exits.
- Repair damaged surfaces before applying new markings.
- Train staff on the colour system.
- Inspect and refresh markings regularly.
Hazard Zone Markings in Industrial Facilities work best when they are simple, visible, and maintained. The right marking system helps people recognise risk faster and move with greater confidence.
Frequently Asked Questions
1. What are hazard zone markings in industrial facilities?
Hazard zone markings are floor or surface markings that highlight danger areas, caution zones, machine boundaries, pedestrian exclusions, fire equipment access, and high-risk spaces inside industrial facilities.
2. What colours are used for hazard zone markings?
Common colours include red for danger or fire equipment, yellow for caution or aisles, and black/yellow for high-risk hazards. The key is using colours consistently across the site.
3. Why are machine safety markings important?
Machine safety markings show where workers should stand, move, load materials, or stay clear. They help reduce confusion around moving parts, maintenance zones, control panels, and restricted access areas.
4. How often should hazard markings be refreshed?
Hazard markings should be refreshed when they become faded, damaged, unclear, or no longer match the site layout. High-traffic areas and outdoor yards usually need more frequent inspections.
5. Can hazard markings reduce industrial accidents?
Yes, clear hazard markings can help reduce accident risks by warning people early, separating traffic, protecting emergency access, defining machine zones, and keeping storage out of dangerous spaces.