What Is a Driveway Culvert?
A driveway culvert looks simple from the surface, but one sizing mistake or drainage error can flood a driveway, wash out the base, or collapse the entrance over time. The serious step is to understand that Correct Sizing is Critical, Precise Placement Math, ditch flow, erosion control, and Legal Permits & Underground Utilities before installation begins. The experienced solution is to calculate the water flow properly, install the pipe with the correct slope and gravel support, and protect the inlet and outlet from erosion before resurfacing the driveway.
Tip: A properly installed culvert improves drainage and helps protect your driveway from water damage and erosion. Get A Free Quote for expert guidance.
What Is a Driveway Culvert?
A driveway culvert moves stormwater beneath the driveway instead of letting water wash over the surface. This section explains the purpose, structure, materials, and why culverts fail.
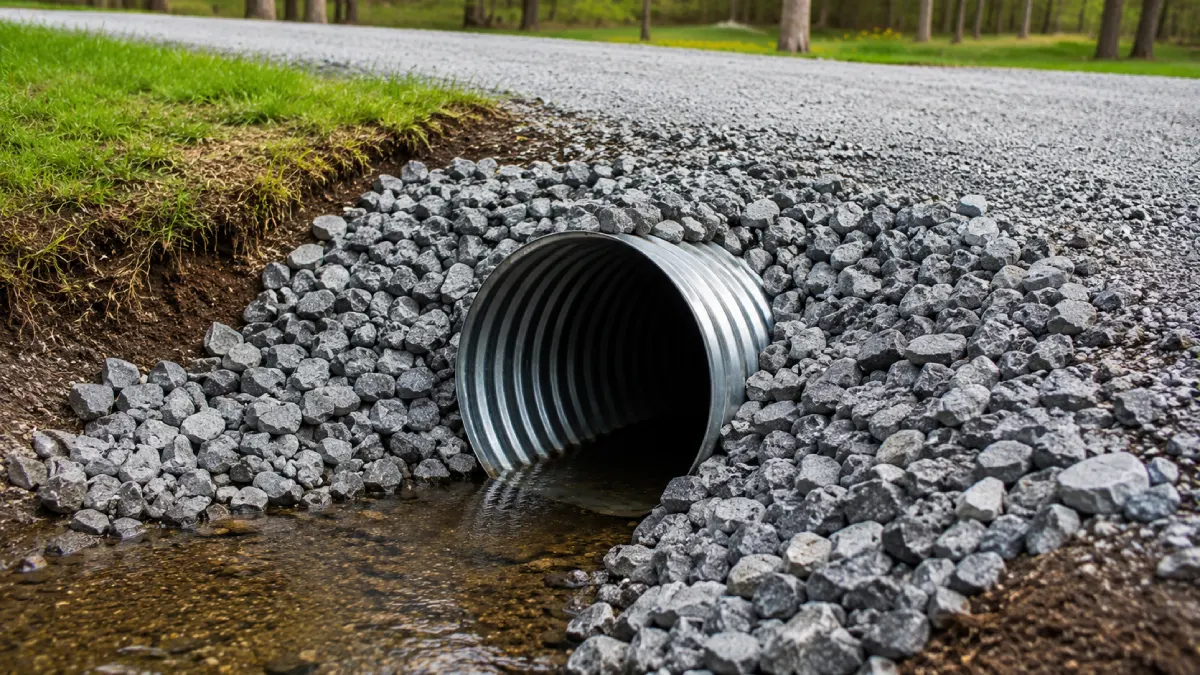
What Is a Driveway Culvert? A driveway culvert is a pipe installed beneath a driveway crossing so water can flow through a roadside ditch, drainage channel, or small stream without damaging the driveway above.
Without a culvert, the driveway acts like a barrier. Rainwater collects against the entrance, floods the area, weakens the sub-base, and starts washing out gravel, asphalt, concrete, or resin-bound surfaces.
A driveway culvert helps with:
- Stormwater flow
- Driveway drainage
- Erosion prevention
- Roadside ditch connection
- Base protection
- Water runoff control
- Surface lifespan
- Flood reduction
A specialist such as Total Surfacing Solutions can inspect drainage flow, driveway structure, and resin-bound surfacing before recommending culvert work or resurfacing around the entrance.
| Culvert Material | Main Feature | Main Watch Point |
| HDPE plastic | Lightweight and rust-resistant | Needs correct support |
| Corrugated metal | Strong and traditional | Can rust over time |
| Concrete | Very durable | Heavy and harder to install |
| Dual-wall pipe | Smooth flow interior | Needs proper bedding |
The culvert is not only a pipe. It is part of the entire driveway drainage system.
Correct Sizing is Critical: Pipe Failure Risks
Correct Sizing is Critical because undersized culverts are one of the biggest causes of flooding and washout. This section explains diameter, ditch flow, and driveway width sizing.
Correct Sizing is Critical because a culvert that is too small cannot handle the water volume during heavy rain. Water backs up at the inlet, rises over the driveway, and starts eroding the base and surrounding soil.
Residential driveways commonly use pipes around 12 to 15 inches in diameter. Larger drainage areas may need 18 to 24 inches or more, depending on flow rate, ditch depth, and local requirements.
Sizing should consider:
- Drainage area
- Rainfall intensity
- Ditch flow speed
- Pipe diameter
- Driveway width
- Future runoff increase
- Soil type
- Debris movement
- Roadside drainage rules
- Erosion risk
Pipe length matters too. A standard pipe may come in 20-foot sections, but the installed length often needs extra width for sloped ditch sides and stable edge support.
For driveway access planning, the driveway width guide can help homeowners understand how driveway width affects culvert span and drainage crossing length.
| Drainage Area | Common Pipe Range |
| Small residential flow | 12–15 inches |
| Medium roadside ditch | 18 inches |
| Larger runoff area | 24 inches or more |
| Heavy storm flow | Engineer review recommended |
An undersized culvert may work during light rain and fail during one major storm. That is why proper sizing matters from the beginning.
Precise Placement Math: Slope & Depth
Precise Placement Math controls whether the culvert drains properly or fails under pressure. This section explains burial depth, pipe slope, heavy load protection, and flow direction.
Precise Placement Math is just as important as pipe size. A correctly sized culvert can still fail if the slope, trench depth, or pipe angle is wrong.
The culvert should usually slope downward from the inlet to the outlet so water continues moving instead of sitting inside the pipe. Many installations aim for a roughly 0.5% to 2% slope, depending on flow speed and erosion concerns.
Placement rules usually include:
- 12–24 inches of cover
- Stable gravel bedding
- Continuous trench grade
- Proper pipe alignment
- Correct flow direction
- Compacted side support
- Heavy-load protection
- Outlet erosion control
- No sharp low spots
- Consistent ditch connection
A shallow pipe can be crushed under heavy vehicles. A pipe that is too flat collects sediment. A pipe that is too steep can blast water out fast enough to erode the downstream ditch.
| Placement Error | Common Result |
| Pipe too shallow | Crushing risk |
| Pipe too flat | Sediment blockage |
| Pipe too steep | Outlet erosion |
| Uneven trench | Pipe settlement |
| Weak side support | Pipe movement |
For sloped entrances, driveway on slope helps explain why water speed and driveway gradient affect culvert performance.
Good culvert placement is controlled math, not guesswork.
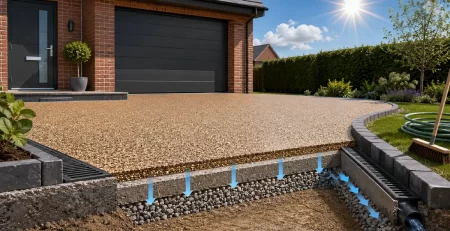
Installation Process: Stable Build
A driveway culvert needs proper excavation, bedding, alignment, and backfilling. This section explains the physical installation stages that protect the driveway structure.
A strong driveway culvert installation follows a clear sequence. Skipping bedding, compacting poorly, or laying the pipe directly on uneven soil often causes long-term settlement and cracking.
The trench should be excavated along the ditch line while maintaining the required slope. Soft soil, roots, loose organic material, and unstable mud should be removed before pipe placement begins.
Typical installation stages include:
- Excavate the trench
- Lay compacted gravel bedding
- Align and place the pipe
- Compact side support
- Backfill in layers
- Shape driveway base
- Protect the inlet and outlet
- Finish the driveway surface
Gravel bedding is especially important. Pipes should not sit directly on uneven dirt because unsupported sections can sag or crack under load.
| Installation Stage | Main Goal |
| Excavation | Create a correct trench path |
| Gravel bedding | Support the pipe evenly |
| Pipe alignment | Maintain water flow |
| Layered backfill | Prevent settlement |
| Compaction | Protect against movement |
| Surface shaping | Maintain driveway stability |
For aggregate support under the driveway, driveway gravel size can help explain how the right stone size improves load support and drainage.
A driveway culvert is strongest when the surrounding soil and gravel lock the pipe into position evenly.
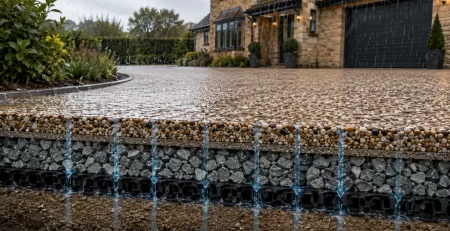
Erosion Control Ends: Water Protection
Water exiting a culvert can destroy the surrounding soil quickly. This section explains riprap, flared ends, headwalls, and outlet protection methods.
Water accelerates as it moves through a culvert. Without protection at the inlet and outlet, the force of flowing water can cut into the soil and undermine the driveway edge.
Erosion usually begins near the outlet where fast-moving water exits the pipe, and strikes exposed dirt. Over time, this can hollow out the ditch, weaken the pipe edge, and damage the driveway structure above.
Common erosion-control methods include:
- Riprap stone
- Flared end sections
- Concrete headwalls
- End caps
- Geotextile fabric
- Reinforced ditch shaping
- Vegetation stabilisation
- Energy-dissipating stone beds
Riprap uses heavy interlocking stone around the culvert ends to absorb water energy. Headwalls or end caps help hold the surrounding soil in place.
| Erosion Control Method | Main Purpose |
| Riprap | Absorb water force |
| Flared end section | Smooth water transition |
| Headwall | Lock surrounding soil |
| Geotextile fabric | Reduce soil washout |
| Stone apron | Protect the ditch bottom |
For existing washout problems, driveway erosion fix can help explain how erosion spreads into the driveway base.
A culvert failure often begins at the ends, not in the middle of the pipe.
Legal Permits & Underground Utilities: Avoid Fines
Legal Permits & Underground Utilities must be checked before digging begins. This section explains permits, roadside ownership, utility marking, and driveway approval risks.
Legal Permits & Underground Utilities matter because roadside ditches, drainage channels, and highway edges are often controlled by councils, highway authorities, or drainage bodies.
A homeowner should not assume they can dig beside the road freely. Many locations require a permit before installing or replacing a driveway culvert.
Before excavation, check:
- Roadside ownership
- Culvert permits
- Highway approval
- Utility line marking
- Water authority rules
- Drainage board restrictions
- Driveway crossover rules
- Pipe sizing requirements
- Ditch maintenance rules
- Contractor approval needs
Underground utilities are another major risk. Gas, telecom, water, drainage, and electrical lines often run parallel to roadside ditches.
People checking widen driveway permission UK should also understand that driveway expansion and culvert work can involve the same highway and drainage approvals.
| Legal or Utility Risk | Possible Problem |
| No permit | Enforcement action |
| Unknown utility line | Dangerous strike |
| Wrong pipe size | Permit rejection |
| Blocked ditch flow | Flooding complaint |
| Incorrect grading | Water backup |
| Unapproved access | Highway issue |
For apron-related access rules, driveway apron responsibility helps explain where private driveway work meets public highway responsibility.
The permit process often protects the homeowner from expensive drainage mistakes later.
Resin Driveway Drainage: Surface Planning
A driveway culvert should work together with the driveway surface above it. This section explains resin-bound drainage, permeability, edge support, and surface protection.
A resin-bound driveway can work very well with a culvert because permeable surfacing helps rainwater drain naturally instead of trapping runoff above the pipe crossing.
However, the culvert and the surface must be planned together. If the driveway holds water above the culvert or allows runoff to cut into the edges, the entrance may weaken over time.
A resin-bound driveway near a culvert should be checked:
- Permeable sub-base
- Edge restraint
- Water direction
- Pipe cover depth
- Surface flexibility
- UV-stable resin
- Anti-slip texture
- Vehicle load rating
- Drainage channels
- Long-term maintenance
People comparing surfaces should review resin driveway pros cons before choosing the final driveway finish.
| Surface Type | Drainage Strength | Watch Point |
| Resin bound | Permeable and clean | Needs a correct base |
| Gravel | Strong drainage | Movement and washout |
| Asphalt | Practical surface | Surface runoff |
| Concrete | Strong structure | Water direction control |
| Pavers | Decorative drainage option | Joint maintenance |
If the driveway connects to a road entrance, driveway apron meaning helps explain how the culvert and apron work together.
A contractor such as Total Surfacing Solutions can design the driveway surface and culvert as one drainage system instead of separate parts.
Area Coverage for What Is a Driveway Culvert?
Driveway culvert planning depends on ditch flow, rainfall, driveway width, drainage design, and local authority requirements. These area sections explain how Bedfordshire, Cambridgeshire, Essex, Hertfordshire, and Oxford homeowners should approach culvert installation.
Modern Resin Driveway In Bedfordshire
For resin bound driveways in Bedfordshire, driveway culverts often become important where roadside ditches carry seasonal rainwater beside rural or semi-rural entrances.
A poorly sized culvert can allow water to back up and soften the driveway base near the entrance. That usually leads to settlement, edge cracking, or gravel washout after heavy rain.
Bedfordshire homeowners should confirm ditch flow direction, culvert depth, and driveway width before resurfacing. A resin-bound driveway can perform well above a culvert when the base and drainage structure are planned together.
Modern Resin Driveway In Cambridgeshire
For resin bound driveways in Cambridgeshire, the culvert slope becomes especially important because flatter sites can slow drainage movement.
If the pipe is too level, sediment may build up inside the culvert. If the ditch cannot move water efficiently, the driveway edge may stay wet and weaken over time.
Cambridgeshire homeowners should also check for soft ground near the roadside. Stable bedding and compacted backfill are critical where water regularly saturates the soil around the pipe.
Resin Bound Driveway In Essex
For resin bound driveways in Essex, a culvert should protect both drainage performance and kerb appeal. The driveway entrance often needs to look neat while still managing heavy runoff.
A resin-bound driveway can help create a cleaner appearance around the culvert crossing, but the drainage structure underneath still controls long-term stability.
Homeowners considering property presentation may also review driveway increase home value. A dry, stable, professionally finished entrance usually supports value better than a washed-out driveway edge.
Resin Driveway Installation In Hertfordshire
For resin bound driveways in Hertfordshire, sloped driveways and moving water create higher erosion pressure near culvert outlets.
If water exits the pipe too fast, the ditch can wash out and undermine the driveway edge. Riprap, headwalls, and stable grading become more important where slopes increase water speed.
For unstable or muddy roadside entrances, muddy driveway fix may help homeowners understand how water movement weakens driveway edges.
Oxford: Permits and Access Rules
For resin bound driveways in Oxford, culvert work may involve more attention to permits, roadside drainage ownership, and access approvals.
A culvert can sit partly within highway-controlled drainage areas. That means homeowners should confirm local requirements before excavation begins.
Oxford homeowners should also think about surface integration. A resin-bound driveway above a culvert can create a neat entrance, but the driveway structure, drainage, and permit requirements should all be resolved first.
Best Resin Driveway Finishes In Oxford
A driveway culvert should be sized, placed, supported, and protected correctly before the driveway surface is finished. This section gives a practical checklist before installation begins.
Before installing or replacing a driveway culvert, check:
- How much water flows through the ditch?
- Is the pipe diameter large enough?
- Does the pipe slope correctly?
- Is the trench stable?
- Will the driveway’s weight crush the pipe?
- Is gravel bedding included?
- Will the outlet erode?
- Are permits required?
- Have utilities been marked?
- Will the driveway surface drain properly?
For driveway resurfacing costs after drainage upgrades, driveway widening cost and paver driveway cost may help with planning.
| Checklist Point | Best Outcome |
| Correct pipe size | No flooding |
| Proper slope | Continuous water flow |
| Stable bedding | Less settlement |
| Protected outlet | Reduced erosion |
| Permit approval | Fewer legal problems |
| Surface drainage | Longer driveway lifespan |
A driveway culvert is strongest when the drainage system, driveway base, and surface finish all work together.
Frequently Asked Questions: Driveway Culverts
1. What size pipe is used for a driveway culvert?
Many residential driveway culverts use pipes around 12 to 15 inches in diameter. Larger drainage areas or stronger storm flow may require 18 to 24 inches or larger, depending on local rules.
2. How deep should a driveway culvert be buried?
The pipe usually needs at least 12 inches of cover beneath the driveway surface. Heavy vehicles or trucks often require deeper coverage, around 18 to 24 inches for protection.
3. What happens if a culvert is too small?
An undersized culvert can block water flow, flood the ditch, wash out the driveway edge, and damage the driveway base during heavy rainfall or storm runoff.
4. Do I need permission to install a driveway culvert?
Often, yes. Many councils or highway authorities require permits because roadside ditches, drainage flow, and driveway access can affect public infrastructure and neighbouring properties.
5. What is the best material for a driveway culvert?
HDPE plastic is popular because it is lightweight and resistant to rust. Corrugated metal is strong but may corrode over time. Concrete is extremely durable but much heavier to install.